Have you ever gotten so caught up in a project that you hated to put it down so you could do something else that needed done? If you’ve never let the dishes go so you could finish one more chapter of a book, or forgotten an important appointment because you had too much else to think about, you’re a rare creature indeed. Most of us need a little help keeping track of schedules, and kids are no different than adults in that regard. For kids with ADHD, autism, or other developmental difficulties, this can be especially challenging. Whether your child has a hard time focusing on the task at hand or focuses so hard that he has trouble moving on to the next thing, a picture schedule (sometimes called a visual schedule) might help.
A picture schedule shouldn’t be complicated. The goal is to make clear what is going to be taking place during a particular time period: anything from a full weekend, to an after school routine, to a particular activity like attending a birthday party. If your child is doing it, you can make a picture schedule for it.
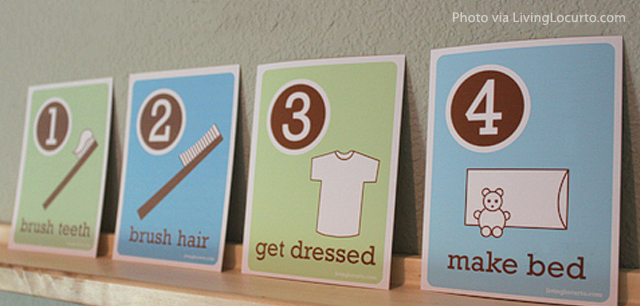
First, make a list of everything you want to include in your child’s picture schedule. A typical schedule for a morning routine might look like this: Wake up, go potty, wash hands, get dressed, eat breakfast, brush teeth, comb hair, put on shoes, pick up backpack and lunch box, buckle your seat belt, arrive at school. Now, decide which pictures to use to represent each activity.
You can download or draw simple pictures for your picture schedule, or for a more personalized look, take photos to create the schedule. You might photograph your child buckled into his car seat, snap a photo of his school to show where he goes in the morning, or use a photo of him feeding the cat to remind him of his chore.
For a routine that’s the same every day, simply lay out the photos in order, glue or tape them down, and write in captions if necessary. You might want to laminate the schedule for longevity.
For a flexible schedule, cut out and laminate the pictures. Laminate a sheet of paper and affix a row of Velcro dots or squares to the paper in a line. Attach the other side of each Velcro piece to the backs of the the laminated pictures. Store the pictures in an envelope or box and simply add and remove them when necessary. For example, your weekday morning schedule might look like the example above, but for weekends, you might remove the school-related pictures and replace them with a picture of the park or Grandma’s house.
The most important thing about a picture schedule is that you use it. Refer to it often. Show your child what she’s going to be doing, and when it’s close to transition time, point out the next activity on the schedule: “Ellen, right now you’re playing with trains, but see? In five minutes, it’s time to wash your hands for dinner.” Use lots of “first-then” statements to reinforce what’s on the schedule: “First you have your snack, then you watch a video.” In time, your child may learn to refer to the schedule on her own, without help--and that will be one less thing on your busy schedule, too.
Creating a Picture Schedule
-April Fox, Staff Writer
Carolina Pediatric Therapy © November 2013